About Me

My photo
Welcome to my blog- A place of food, cakes and bakes! Just a fun-loving student who loves to bake!
Showing posts with label Birthday. Show all posts

Wednesday, 12 December 2012

The Mighty Mince Pies Are Back!

On the first day of Christmas my true love gave to me.. a partridge in a pear tree. It's nearly Christmas! And so the mince pies have come made their first winter appearance. Now I'm ashamed to say that I was never a fan of mince pies until I bakes these last year with my Mumma. I liked them so much that they are going to be my first Christmassy bake this year. 
Things have been so busy recently and also very musical. My mumma and I went to a strings concert last week and then went to see Carmen the Opera in London was very urrm unusual but still had amazing singing and music. At school ,we then had our Christmas concert where my friends and I performed as a harmony group. The following was my birthday and I had a great time but I'm now very much looking forward to Christmas! 


You'll need:
175g (6oz) Plain Flour
100g (3½oz) Margarine or Unsalted Butter, cubed
1 egg yolk, beaten
350g (12oz) Mincemeat
Icing Sugar

To make the pastry, rub the butter into the flour to create a "breadcrumbs" effect. Make a well in the centre and add the egg yolk and work it into the dough. You made need to add some water if the dough is dry. 
Knead the dough gently, until smooth. Wrap in cling-film and leave to cool in the fridge for 15 minutes. 

Preheat the oven to 180oC/355oF/ Gas Mark 4. On a floured surface, roll out the pastry to a thickness of 0.5 cm. You don't want it to be thick as you'll get a whole mouthful of pastry! Using a crimpled round cutter, cut out 12 circles. Grease a 12 hole muffin/cupcake tin and line each whole with a pastry circle. Gently, press the circle fully into the hole. 

Spoon a generous teaspoon of mincemeat into each case. Roll out the left over pastry and cut different Christmas shapes and place on top of the mincemeat. Glaze the pies with milk or egg yolk and bake for 20 minutes, until golden brown. Cool on a wire rack and sprinkle with icing sugar. These are lovely served with cream; double or brandy flavoured. 

Happy Baking! 
x

Please leave a comment below! 
Follow @nicsfeasts and @NicckkNackk


Sunday, 21 October 2012

Mum's Chocolate Marble Birthday Cake

What a great 2 weeks I've had! The show, Half a Sixpence, was really good and I had a fab time! Then on the last day, Saturday, it was my mum's birthday so I made a big fuss of her and as she was doing the show to, she had a lovely birthday. Saturday becomes a very busy day as we do two performances, so I promised my mum that I'd make her a birthday cake on Sunday (despite being very tired from the after party on Saturday night). Originally, I was going to bake Lorraine Pascale's Crounching Tiger Hidden Zebra Cake:

but I didn't have time to buy the disposable icing bags, so I settled for a marble cake. 


And this week we had the Great British Bake Off Final! And John won!!! I was torn between John and James so I didn't mind if either if them won as they both fully deserved it. I did like Brendan but his bakes didn't appeal to me as much. Who did you want to win? 

For the cake you'll need: 
175g (6oz) Butter/ Margarine, At room tempertaure
175g (6oz) Caster Sugar
1½ tsp  Vanilla Extract
3 Eggs, At room tempertaure
150g (5oz) Self-Raising Flour, sifted
1 tsp Baking Powder, sifted
25g Cocoa Powder, sifted

Preheat the oven to 180oC/350oF/Gas Mark 5. Grease and base line 2 8inch sandwhich tins with greaseproof paper.  

Cream the butter and sugar together, until light and fluffy, with an electric hand mix. Add the vanilla extract and add the eggs one at a time with a tbsp of flour. Beat until each is egg is fully combined. Fold in the rest of the flour and the baking powder.

Split the mixture into two bowls and fold in the chocolate powder into one of the mixtures. 


Put half of the vanilla mixture into one tin, and the rest in the other. Do the same for the chocolate mixture. 

Use the the handle of a spoon to swirl the two mixtures into each other. Then bake for 20-25 minutes; a skewer should come out clean when inserted and when pressed, the cake should spring back. leave to cool in their tins for 5 minutes, then turn out onto a wire rack and peel off the greaseproof paper off of the bottom. 


Due to my tiredness, I simply decorated the cake with chocolate buttercream and chocolate chips.


Happy Baking! 
x

Please leave a comment below! 
Follow @nicsfeasts and  @NicckkNackk


Sunday, 17 June 2012

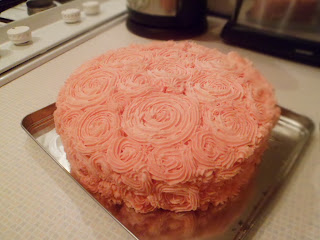
Beth's Birthday Rose Cake

I baked this in May for a  friends birthday and she loved it! I got the idea from a friend (who is an excellent baker! Click her to go to her blog.) and decided to try it. My friend doesn't like chocolate cake (A crime, I know.) so this is a vanilla sponge with vanilla icing. The icing takes a steady hand and a lot of patience; But in my opinion, it's worth it.


 I got the sponge recipe from one of my recipe books I got for Christmas- Home Bake by Eric Lanlard. I haven't had a chance to try out a lot of his recipes but I was very impressed by the way this cake turned out!

For the sponge:
175g (6oz) Unsalted Butter, at room temperature, plus extra for greasing. (I used Stork Margarine)
175g (6oz) Caster Sugar
1½  tsp Vanilla Extract ( I use Sainsbury's Taste The Difference Madagascan Extract)
3 Eggs, at room temperature.
175g (6oz) Self-Raising Flour, Sifted
1 tsp Baking Powder, Sifted

Preheat the oven to 180oC (fan 160oC/350oF/Gas Mark 4). Grease two 7inch sandwhich tins and base-line with baking paper. (Click here to see how)

Cream the butter/margarine and sugar together in a large bowl until light and fluffy. Use an electric whisk for best results. Add the vanilla extract and gradually beat in one egg with a tablespoon of flour, until creamy and well-combined. Continue with the two other eggs. Gently fold in the remaining sifted flour and the baking powder, using a large metal spoon.

Divide the mixture between the two tins and smooth the tops. Bake for 18-20 minutes, until they are well risen and spring back when lightly pressed. Leave to cool in tins for 5 minutes, then turn out onto a wire cooling rack. Leave to cool completely before icing.

For the Icing:
200g (8oz) Unsalted Butter (Again, I used Stork)
405g (14oz) Icing Sugar, Sifted
1½ tsp of Vanilla Extract

Place the butter into a mixing bowl and beat until creamy. For best results use an electric whisk. Add a third of the icing sugar and beat well. Continue this method until all the icing sugar is used. When it is all added, it should be light and creamy. Finally, add the vanilla extract.

Take some icing and cover the whole cake in a light layer of icing using a spatula or pallet knife. This is to seal any crumbs and to make sure no cake can be seen once the roses have been added.

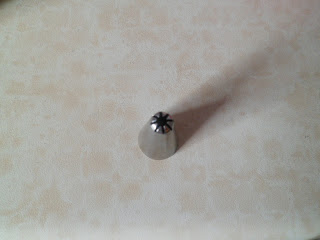
My first icing bag was a Tala one that came with 6 nozzles. To get the rose effect, I used a Tala No. 30 star nozzle but I think any star nozzle with create the look of a rose. Obviously, a bigger star will create the look of bigger petals and smaller one will create tight roses. Personally, I prefer the bigger look.

Fill your icing bag two thirds full and have a firm grip on the bag. To pipe a rose, start in the middle of where you want your rose to be and pipe OUT to create a spiral. You can make the roses as big or as small as you like and I think a mixture of sizes look good. I found it was good to practise a couple on a wipe able surface or baking paper.

A variation of this cake is to used Cream Cheese Icing as it makes the roses look "fluffier".

Happy Baking! 
x

Please leave a comment below! 
Follow @NicckkNackk