About Me

My photo
Welcome to my blog- A place of food, cakes and bakes! Just a fun-loving student who loves to bake!
Showing posts with label Cake. Show all posts

Tuesday, 27 November 2012

Orange Upside-Down Pudding Cake

Well it seems ages since I've been on here writing a blog! School has got busy and I feel I can never justify neglecting that spanish coursework that needs learning in order to bake. But I found a window of opportunity to bake when my godparents came to visit and a pudding was needed. Mum had ventured into the sweet side of the kitchen (usually cakes are a "no go" area" and had baked this a few days before and we liked it so much that I made it again. It's best served with thick double cream and when it's slightly warm. It's very much a feel good pud!


You'll need:
2-3 Big Oranges
1 tbsp Brown Sugar
115g (4oz) Margarine, plus extra, at room temp.
115g (4oz) Caster Sugar
2 Eggs, at room temp.
115g (4oz) Self Raising Flour, sifted

Preheat the oven to 180oC/356oF/Gas Mark 4. You will need 1 8 inch cake tin. If your using a non stick tin, just greaes it. If not, line the bottom with greaesproof paper as well as greasing.

Grate the rind of 2 oranges and put to one side. Using a sharp knife, cut away the skin and the pith and cut the oranges into slices. Reserve the juices for later. Place the orange slices on the bottom of the tin. If you would like the entire top of the cake to be covered, you may need to use 3 oranges, if not, 2 will be sufficient. Using the extra margarine, dot the oranges with it and sprinkle over the brown sugar.


For the cake mixture, cream together the margarine and sugar using an electric mixer. Mix in the orange rind. Add 1 egg and beat well, repeat. Fold in the flour. The mixture may be quite dry; if so add in the juices from cutting the oranges. 

Spoon the mixture onto the oranges, making sure no orange can be seen. Bake for 25-30 minutes. The top may go very brown before the middle is cooked; If so, cover with tin foil and leave to cook inside. 


The pudding will be cooked when the cake is firm and springs back when touched. Also, when a skewer is entered into the middle, it will come out clean. Leave to cool for 4 minutes in the tin and then turn out onto the serving plate. Serve hot or cold. 

Happy Baking! 
x

Please leave a comment below! 
Follow @nicsfeasts and @NicckkNackk

I am entering this into Tea Time Treats by Lavender and Lovage. The theme this month is cake.


P.S Here's a picture of me and my friends at Bryony's Alice In Wonderland themed fancy dress party for her birthday. Yes, there is a Shrek and Fiona in the picture. They were supposed to wear the outfit earlier in the year but were unable to so they wore it to this party. But, to be honest, the costumes were so good, we let them off! 


Sunday, 21 October 2012

Mum's Chocolate Marble Birthday Cake

What a great 2 weeks I've had! The show, Half a Sixpence, was really good and I had a fab time! Then on the last day, Saturday, it was my mum's birthday so I made a big fuss of her and as she was doing the show to, she had a lovely birthday. Saturday becomes a very busy day as we do two performances, so I promised my mum that I'd make her a birthday cake on Sunday (despite being very tired from the after party on Saturday night). Originally, I was going to bake Lorraine Pascale's Crounching Tiger Hidden Zebra Cake:

but I didn't have time to buy the disposable icing bags, so I settled for a marble cake. 


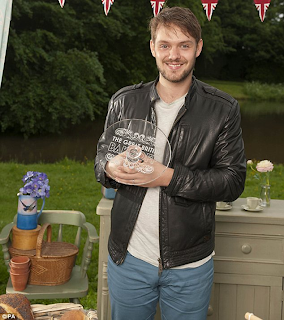
And this week we had the Great British Bake Off Final! And John won!!! I was torn between John and James so I didn't mind if either if them won as they both fully deserved it. I did like Brendan but his bakes didn't appeal to me as much. Who did you want to win? 

For the cake you'll need: 
175g (6oz) Butter/ Margarine, At room tempertaure
175g (6oz) Caster Sugar
1½ tsp  Vanilla Extract
3 Eggs, At room tempertaure
150g (5oz) Self-Raising Flour, sifted
1 tsp Baking Powder, sifted
25g Cocoa Powder, sifted

Preheat the oven to 180oC/350oF/Gas Mark 5. Grease and base line 2 8inch sandwhich tins with greaseproof paper.  

Cream the butter and sugar together, until light and fluffy, with an electric hand mix. Add the vanilla extract and add the eggs one at a time with a tbsp of flour. Beat until each is egg is fully combined. Fold in the rest of the flour and the baking powder.

Split the mixture into two bowls and fold in the chocolate powder into one of the mixtures. 


Put half of the vanilla mixture into one tin, and the rest in the other. Do the same for the chocolate mixture. 

Use the the handle of a spoon to swirl the two mixtures into each other. Then bake for 20-25 minutes; a skewer should come out clean when inserted and when pressed, the cake should spring back. leave to cool in their tins for 5 minutes, then turn out onto a wire rack and peel off the greaseproof paper off of the bottom. 


Due to my tiredness, I simply decorated the cake with chocolate buttercream and chocolate chips.


Happy Baking! 
x

Please leave a comment below! 
Follow @nicsfeasts and  @NicckkNackk


Saturday, 14 July 2012

Pretty Pink Rose Wedding Cake

It's become a tradition at my school, that when you reach Year 10, the whole year puts on a mock wedding.  Now, whenever I mention this to someone, I always get the same reaction. The puzzled look. Why would a school hold a mock wedding? It's strange I know. And I'm not totally sure why we do it. We are a Church of England school and part of our R.E (religious education) GCSE is to do with Christian Weddings and Divorce. It's also ran by the students who took long course R.E (meaning the get a full GCSE in it, as opposed to half). So they organise it and have first pick of the roles. Yes, there's the bride, the groom, ushers, bridesmaid, the whole shoobang really. One of my good friends, Clare, was picked to be the bride and she looked amazing!    
  

Most of my friends ad become involved. One was the photographer, another the hair stylist, one in the band and then two in the bridal party. So I offered to make the wedding cake along with two other friends. Originally I hadn't realised what a big task it was. And our R.E teacher assured me it had been done well in the past so we had to impress. The first mammoth task was to find a recipe and the correct cake tins. It was harder than you think. But with help from teachers and my mums friends we got a 12 inch, a 10 inch, an 8 inch and a 6 inch. The next part was the fun part; Designing the cake! And we weren't short of ideas.


We decided to match the colour scheme of pink and go for sponge as fruit cake was expensive and we were on a budget! We used butter icing for the two chocolate layers and royal icing for the 2 vanilla layers.

For the 12 inch Chocolate layer:

340g (12oz) Margarine, at room temperature
340g (12oz) Caster Sugar
6 eggs
170g (6oz) Self Raising Flour, sifted
70g Cocoa Powder, sifted
3 tsp Baking Powder, sifted
1 tsp Vanilla Extract

Preheat the oven to 180oC/356oF/ Gas Mark 4. Grease and line the cake tin with greaseproof paper or baking parchment. 


Cream the margarine and caster sugar together in a bowl until light and fluffy.

 Add 2 eggs wit ha heaped tablespoon of the flour. Beat well. For best results use an electric hand whisk. Repeat for all 6 eggs. 
Fold in the remaining flour, the baking powder, the cocoa powder and the vanilla extract using a large metal spoon. When all the ingredients are combined, pour into the prepared cake tin and bake for 45-50 minutes.

To make sure it's cooked thoroughly, place a skewer through the middle of the cake and it should come out clean. 
                                     
Leave the cake in it's tin to cool for 5 minutes and then transfer to a wire rack


Repeat these steps for the other 3 tiers, using the following ingredients and cooking times. 

For the 10 inch Vanilla Layer:
280g (10oz) Margarine
280g (10oz) Caster Sugar
5 Eggs
280g (10oz) Self Raising Flour, sifted
2 ½ Baking Powder, sifted
2 tsp Vanilla Extract

35-45 Minutes

For the 8 inch Chocolate Layer: 
225g (8oz) Margarine
225g (8oz) Caster Sugar
4 Eggs
180g (6oz) Self Raising Flour, sifted
45g Cocoa Powder, sifted
2 tsp Baking Powder, sifted
1 tsp Vanilla Extract

25-35 Minutes

For the 6 inch Vanilla Layer
140g (5oz) Margarine
140g (5oz) Caster Sugar
2 Eggs
140g (5oz) Self Raising Flour
1½ tsp Baking Powder
1 tsp Vanilla Extract

20-25 Minutes

For the chocolate layers, they are going to be decorated with butter icing. We made our batches of icing our of 500g of Sieved Icing Sugar and 250g of Margarine. Colour it with pink food colouring. Cover the inch in a thin layer of butter cream to seal any crumbs. Then use the technique I used in Beth's Rose Birthday Cake to create the rose look. For the 8 inch cake, I used 2 8 inch sandwich tine, but if your using 1 big 8 inch tin then cut the cake in half. Sandwich the two halves together with butter cream and repeat the steps for the 12 inch. By this time, you will have had to make more icing. 


When decorating, the vanilla layers are covered in white royal icing. Firstly, cover them in a very thin layer of butter cream. This is so that the royal icing sticks. Roll out some icing to a depth of 4mm. To find out a big to roll out, take a clean ruler and measure the length of the side, top and other side.

Place onto a rolling pin and lift up and onto the cake. Use a cake smoother to create a clean finish. Use a sharp knife to cut vertically down to remove excess icing at the base. Repeat with the cake smoother. 
Use this method for both vanilla cakes.

When stacking the cake layers, you must do this at your venue. To support our cake, we inserted straws into the bottom 3 layers and then placed the layers on top. This did work, but we could see that it started to sink after a few hours. So I would recommend watching this video as to how to stack your cake. 

For extra decoration, I bought this butterfly cutter in a sale at Lakeland and I love it! The butterflies are so cute and were the perfect finishing touch. 
Simply, roll out some icing and cut the butterflies. For an extra finish, I layed them on creased cardboard to bend their wings so they looked more realistic. 


Happy Baking! 
x

Please leave a comment below! 
Follow @NicckkNackk


 P.S A picture of me and my friend millie :)


Sunday, 8 July 2012

Classic Victoria Sponge

I've been looking for the perfect Victoria Sponge recipe for a while now, and I've finally found one. Funnily enough it wasn't in a fancy cookery book or on a well known website. My mum gets The Telegraph on a Saturday and sometimes they give away free cooking booklets and a while ago they had a one by the River Cottage. And it's brilliant! It's got a mixture of unusual cakes, the classics and new cakes to try. So I thought I'd give it a go and cook it for my acting company's tea break- Epsom Light Opera Company. (Visit our website: http://www.eloc.org.uk/) They were all very impressed and it went down a treat!

For the Sponge:
175g (6oz) Self Raising Flour, Sifted
Pinch of Salt
175g (6oz) Butter, Softened (I use Stork Margarine)
175g (6oz) Caster Sugar
3 Eggs, at room temperature
1 tsp Vanilla Extract

Preheat the oven to 180oC/356oF/Gas Mark 4. Grease 2 x 8inch tins and line the bottom with baking parchment/ Greaseproof paper.

In a bowl, beat the butter until creamy. For best results use an electric hand whisk. Add the caster sugar and continue to beat until the mixture is very light and creamy. This will help to blend the eggs.


Add 1 egg and a tbsp of flour and beat thoroughly. The flour helps to prevent the mixture from curdling. Repeat for the remaining 2 eggs. Mix in the vanilla extract with the last egg.


Fold in the rest of the flour until all is combined. The mixture should drop off the spoon easily when tapped against the side of the bowl. If not, add 1-2 spoonfuls of hot water.


Divide the mixture evenly between the two cake tins and bake for 25 minutes, until golden brown and will spring back when lightly pressed with a finger. Leave them to cool in their tins for a couple of minutes and then turn them out onto a wire cooling rack.


For the Filling:
60g Butter, room temperature
125g Icing Sugar, Sifted (Plus extra for later)
Strawberry Jam

Beat the butter until creamy. Add a third of the icing sugar and beat well. Repeat for the remaining icing sugar. Spread butter icing on top of the bottom layer. Spread a layer of jam onto the bottom of the other cake and sandwich together. To finish, sprinkle with icign sugar.


Variations can include:
  • Using a different flavour jam
  • Filling the cake with sliced strawberries and whipped cream
  • Replacing the jam with lemon curd and adding lemon juice and zest into the cake mixture
  • Replacing 25g of flour with Cocoa powder and replacing 25g of the icing sugar with cocoa powder to create a chocolate cake with chocolate buttercream


Happy Baking! 
x

Please leave a comment below! 
Follow @NicckkNackk


Sunday, 17 June 2012

Beth's Birthday Rose Cake

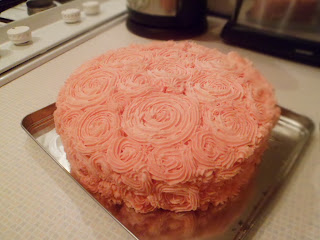
I baked this in May for a  friends birthday and she loved it! I got the idea from a friend (who is an excellent baker! Click her to go to her blog.) and decided to try it. My friend doesn't like chocolate cake (A crime, I know.) so this is a vanilla sponge with vanilla icing. The icing takes a steady hand and a lot of patience; But in my opinion, it's worth it.


 I got the sponge recipe from one of my recipe books I got for Christmas- Home Bake by Eric Lanlard. I haven't had a chance to try out a lot of his recipes but I was very impressed by the way this cake turned out!

For the sponge:
175g (6oz) Unsalted Butter, at room temperature, plus extra for greasing. (I used Stork Margarine)
175g (6oz) Caster Sugar
1½  tsp Vanilla Extract ( I use Sainsbury's Taste The Difference Madagascan Extract)
3 Eggs, at room temperature.
175g (6oz) Self-Raising Flour, Sifted
1 tsp Baking Powder, Sifted

Preheat the oven to 180oC (fan 160oC/350oF/Gas Mark 4). Grease two 7inch sandwhich tins and base-line with baking paper. (Click here to see how)

Cream the butter/margarine and sugar together in a large bowl until light and fluffy. Use an electric whisk for best results. Add the vanilla extract and gradually beat in one egg with a tablespoon of flour, until creamy and well-combined. Continue with the two other eggs. Gently fold in the remaining sifted flour and the baking powder, using a large metal spoon.

Divide the mixture between the two tins and smooth the tops. Bake for 18-20 minutes, until they are well risen and spring back when lightly pressed. Leave to cool in tins for 5 minutes, then turn out onto a wire cooling rack. Leave to cool completely before icing.

For the Icing:
200g (8oz) Unsalted Butter (Again, I used Stork)
405g (14oz) Icing Sugar, Sifted
1½ tsp of Vanilla Extract

Place the butter into a mixing bowl and beat until creamy. For best results use an electric whisk. Add a third of the icing sugar and beat well. Continue this method until all the icing sugar is used. When it is all added, it should be light and creamy. Finally, add the vanilla extract.

Take some icing and cover the whole cake in a light layer of icing using a spatula or pallet knife. This is to seal any crumbs and to make sure no cake can be seen once the roses have been added.

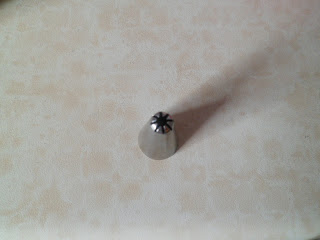
My first icing bag was a Tala one that came with 6 nozzles. To get the rose effect, I used a Tala No. 30 star nozzle but I think any star nozzle with create the look of a rose. Obviously, a bigger star will create the look of bigger petals and smaller one will create tight roses. Personally, I prefer the bigger look.

Fill your icing bag two thirds full and have a firm grip on the bag. To pipe a rose, start in the middle of where you want your rose to be and pipe OUT to create a spiral. You can make the roses as big or as small as you like and I think a mixture of sizes look good. I found it was good to practise a couple on a wipe able surface or baking paper.

A variation of this cake is to used Cream Cheese Icing as it makes the roses look "fluffier".

Happy Baking! 
x

Please leave a comment below! 
Follow @NicckkNackk