About Me

My photo
Welcome to my blog- A place of food, cakes and bakes! Just a fun-loving student who loves to bake!
Showing posts with label Chocolate. Show all posts

Saturday, 30 March 2013

Chocolate Mini Eggs Cupcakes For Easter

Me and my mum always celebrate Easter but it wasn't until this year that I realised all the baking opportunities! I just had to find something that used the iconic mini eggs! And so the Mini Egg Cupcakes were born (or should I say baked!) They were fun to make as I love the smell of chocolate cupcakes baking in the oven and I one or two eggs make have cheekily found their way into my mouth. Also, the actual cupcake has a lovely consistency and goes together really well with the fluffy butter cream. These were baked for my Godmother and her family, whom we always see at Easter. They went down very well for after dinner despite in being spoilt by her fabulous cooking!


This recipe is from one of my favourite books Cupcakes by Susanna Tee. This also had the recipe in for my Light and Fluffy Lemon Cakes
For the cupcakes: 
115g (4oz) Butter, at room temperature ( I used Stork Margarine) 
115g (4oz) Caster Sugar
2 eggs, at room temperature
85g (3oz) Self- Raising White Flour
25g (1oz) Cocoa Powder

Preheat the oven to 180oC/350oF/Gas Mark 4. Put 12 baking cases into a bun tray.

Place the butter and sugar into a bowl and beat together until light and fluffy. For best results, use an electric hand mixer. Sift in the flour and cocoa powder and fold in the mixture. To see how to fold, click here. Spoon the mixture into the paper cases until just under half full.

Bake the cupcakes in for 15-20 minutes until well risen and firm. Transfer to a wire rack to cool.

For the icing:
85g (3oz) Butter, at room temperature (I used stork)
175g (6oz) Icing Sugar, sifted
1 tbsp Milk
2-3 drops of vanilla essence
2 130g packs of Cadbury's Mini Eggs (or equivalent) 

Put the butter into a bowl and beat until fluffy. Add a third of the icing sugar and beat together until well combined. Repeat for the remaining icing sugar. Add the milk and vanilla extract and beat in well.

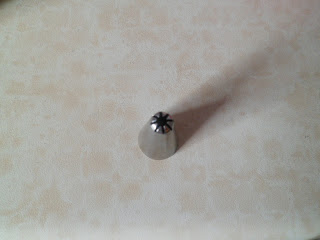
Put the icing into and icing bag, fitted with a large star nozzle and pipe around the edge of the cupcake to create a "nest" Place 3 eggs in the centre of each nest. I experimented and used a large star nozzle to get the lined effect on the nest but also used a different star nozzle to create the swirly look in the picture below. 

The Swirly Effect.


The Lined Effect.


The large Star Nozzle.


The Swirly Star Nozzle.


Happy Baking! 
x

Please leave a comment below! 
Follow @NicckkNackk and @nicsfeats

Wednesday, 20 February 2013

Valentine's Cupcakes

I love it when there's an excuse to bake something really yummy and this time it was cupcakes for a Valentine's Cake Sale we had at school. I may have mentioned it before that in June we have a Leaver's Ball for reaching the end of our time in secondary school, and the prom committee and I are trying different ways to raise money to go towards the cost. We held a cake sale and everyone made (or bought) cakes and biscuits to sell and we made £92! So we were very pleased and it is definitely something we will do again- especially as it's an excuse to get baking! 


The vanilla cupcakes are made from half the mixture used in my Christmas Cupcakes, a recipe from The Great British Bake Off: How to Turn Everyday Bakes into Showstoppers and the same method.

For the chocolate cupcakes, you'll need:
60g (2oz) Butter or Margarine, at room temperature
60g (2oz) Caster Sugar
1 Egg, lightly beaten
45g (1½ oz) Self-Raising Flour, sifted
15g Cocoa Powder, sifted

Preheat the oven to 180oC/350oF/Gas Mark 4 and put 17 cupcake cases or 12 muffin cases into two cupcake trays. 
Beat the butter/margarine and sugar together until light and fluffy. Gradually add the egg, a little at a item and beat thoroughly in-between additions. Fold in the cocoa powder and flour.
Spoon the mixture into the cases and bake for 15-20 minutes. They should be springy and firm to touch. Transfer to a wire wrack and leave to cool.

 For the icing:
140g (5oz) Butter/Margarine, at room temperature
280g (10oz) Icing Sugar, sifted

Beat the butter/margarine until smooth and light. Add the icing sugar a little at a time and beat until well combined. The longer you beat it, the fluffier it will be! Split the mixture in half and add half a tablespoon of cocoa powder to the chocolate icing and a few drops of pink food colouring to the other.
Pipe onto cupcakes and decorate with sprinkles!

 Happy Baking! 
x

Please leave a comment below! 
Follow @nicsfeasts and @NicckkNackk


Tuesday, 29 January 2013

Chunky Chocolate Cookies

Well that's another year gone, and I have to admit, for the first time I was a bit nostalgic about seeing 2012 go. It was a really good year for me; I was bridesmaid for my cousin, we had the Olympics, I got my first principle part in a show, I was made Head Girl, had a good academic year and generally a good time. What was your favourite 2012 moment? Also, the beginning of 2013 didn't look too inviting: January exams (which in my opinion should be illegal), more exams and oh yes, more exams. School definitely likes to load on the pressure. And if I hear my head of year say "This is it" again over this being our last few months at school, I will not be responsible for my actions! On a more positive note, we're organising the yearbook and we have our prom! I can't wait! 

These cookies are from Jo Wheatley's A Passion for Baking. She was the winner of 2011's GBBO and there are so many things I can't wait to bake. In the book, it says this recipe make 10 but I halved the recipe and made 7 cookies roughly 4 inches in diameter, which I found quite big. So using this mixture will probably make 14/15 big ones or 20 smaller ones. 

200g Unsalted Butter, softened
200g Light brown Sugar (I used light brown sugar for both quantities)
125g Demerara Sugar
2 Large Eggs, beaten
1tsp Vanilla Extract
400g Plain Flour
1 tsp Baking Powder
1 tsp Bicarbonate of Soda
a pinch of Salt
200g Dark Chocolate, cut into small chunks

Preheat the oven to 170°C/325°F/Gas Mark 3 and cover 3-4 baking trays with baking parchment or greaseproof paper. 

Cream the butter and both of the sugars together until pale, light and fluffy. Gradually add the beaten eggs, mixing well between each addition. Scrape down the sides to combine all of teh mixture. Add the vanilla extract and mix again.

Sift in the flour, bicarbonate of soda, baking powder and salt into the bowl and mix again until thoroughly combined. Fold in the chocolate chunks.

To get even sized cookies, I gathered the dough into a ball and halved it. I kept halving each section until I got the size I wanted. Roll each division into a ball and flatten to a depth of 1.5 cm and place them onto a baking tray, evenly spaced as they will expand by at least half. Alternatively, you could use an ice-cream scoop to get even sized cookies. 

Bake the cookies in batches in the middle of the oven for 5 minutes. Take them out and bang the tray sharply on a work surface to deflate the cookies and et rid of air bubbles. Continue to bake for a further 7-8 minutes for gooey cookies or 8-10 for slightly crispy cookies. 

Allow the cookies to cool a little on their baking tray before transferring to a wire wrack to cool completely  Store in an airtight container to prevent them going stale.


Happy Baking! 
x

Please leave a comment below! 
Follow @nicsfeasts and @NicckkNackk


Sunday, 21 October 2012

Mum's Chocolate Marble Birthday Cake

What a great 2 weeks I've had! The show, Half a Sixpence, was really good and I had a fab time! Then on the last day, Saturday, it was my mum's birthday so I made a big fuss of her and as she was doing the show to, she had a lovely birthday. Saturday becomes a very busy day as we do two performances, so I promised my mum that I'd make her a birthday cake on Sunday (despite being very tired from the after party on Saturday night). Originally, I was going to bake Lorraine Pascale's Crounching Tiger Hidden Zebra Cake:

but I didn't have time to buy the disposable icing bags, so I settled for a marble cake. 


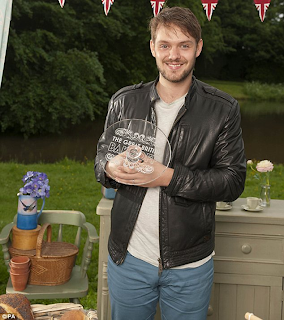
And this week we had the Great British Bake Off Final! And John won!!! I was torn between John and James so I didn't mind if either if them won as they both fully deserved it. I did like Brendan but his bakes didn't appeal to me as much. Who did you want to win? 

For the cake you'll need: 
175g (6oz) Butter/ Margarine, At room tempertaure
175g (6oz) Caster Sugar
1½ tsp  Vanilla Extract
3 Eggs, At room tempertaure
150g (5oz) Self-Raising Flour, sifted
1 tsp Baking Powder, sifted
25g Cocoa Powder, sifted

Preheat the oven to 180oC/350oF/Gas Mark 5. Grease and base line 2 8inch sandwhich tins with greaseproof paper.  

Cream the butter and sugar together, until light and fluffy, with an electric hand mix. Add the vanilla extract and add the eggs one at a time with a tbsp of flour. Beat until each is egg is fully combined. Fold in the rest of the flour and the baking powder.

Split the mixture into two bowls and fold in the chocolate powder into one of the mixtures. 


Put half of the vanilla mixture into one tin, and the rest in the other. Do the same for the chocolate mixture. 

Use the the handle of a spoon to swirl the two mixtures into each other. Then bake for 20-25 minutes; a skewer should come out clean when inserted and when pressed, the cake should spring back. leave to cool in their tins for 5 minutes, then turn out onto a wire rack and peel off the greaseproof paper off of the bottom. 


Due to my tiredness, I simply decorated the cake with chocolate buttercream and chocolate chips.


Happy Baking! 
x

Please leave a comment below! 
Follow @nicsfeasts and  @NicckkNackk


Thursday, 20 September 2012

Cinnamon Pear and Chocolate Tart

It's safe to say that I am a big lover of fruit and, as cheesy as it sounds, I'm very big on getting my five-a-day. So when I go to the kitchen and find a measly grapefruit in the fruit bowl, I'm not a happy bunny. I expressed this to my mumma, and the next day she consoled me with enough fruit to open a fruit stall! Name any fruit and we had it! I couldn't help but giggle when I saw how much she'd bought. Anyway, she'd bought some pears and we don't often have pears so this was exciting times! Except, she'd bought about 6 of them, along with the other mountain of fruit. So being the good non-wasteful person I am (ahem), I came up with this: (excuse the dodgy photography, was in a bit of a hurry!)

 
You'll need:
Approx. 200g Shortcrust pastry
3 Pears, peeled and quartered
110g (4oz) Caster Sugar
Zest of half a Lemon
Cinnamon
50g (2oz) Dark Chocolate
30g (1oz) Butter/Margarine
3 tbsp Golden Syrup/ A large squidge full
1 Egg
Half a tsp Vanilla Extract

Preheat the oven to 200oC/400oF/Gas Mark 6. Grease a 9inch fluted tart tin and line with your pastry. Bake blind for 10 minutes.

Put the pears in a pan and cover with water. Add 50g of the sugar, the lemon zest and a good shaking of cinnamon. Bring to the boil and then cover and gently simmer for 5 minutes. Remove pears and leave to drain in a colander/sieve.


Put the chocolate into a bowl and melt over a pan of simmering water. Meanwhile, heat the sugar and the syrup together until the sugar has dissolved. Make sure the sugar has fully dissolved or you'll end up with slightly crispy crust on top of your filling once cooked. Bring to the boil and then simmer for 3-4 minutes but make sure it doesn't burn. 


Whisk the egg into the melted chocolate and add the syrup mixture along with the vanilla extract. Mix well. On a chopping board, cut small slices in the pears but making sure they don't go all the way through! Pour the mixture into the pastry case and then place the pears in. I did it the other way around and found it hard to  pour in the mixture without covering the pears. Bake for 30 minutes, until the filling is set. 


Happy Baking! 
x

Please leave a comment below! 
Follow @nicsfeasts and  @NicckkNackk

P.S  I am in a show at the Epsom Playhouse called Half A Sixpence with Lottie from Lottie's World of Cakes and Bakes from Tuesday 9th-Saturday 13th October. We play the parts of two shopgirls called Kate and Flo!


Sunday, 2 September 2012

Irresistible Squidgy Chocolate Brownies

You will need:
200g (7oz) Dark Chocolate (Preferably 70% cocoa solids)
150g (5oz) Butter/Margarine, at room temperature
3 Eggs, at room temperature
225g (8oz) Caster Sugar
100g (3½ oz) Plain Flour, sifted
1 tsp Baking Powder
1-2 tbsp Cocoa Powder, sifted


Preheat oven to 180oC (fan 160oC/350oF/Gas Mark 4). Line a 8 inch square tin with greaseproof paper- although I used 7.5 and it worked. Add the butter/marg and half of the chocolate to a heatproof bowl and sit over a pan of gently simmering water to melt the ingredients, stirring occasionally. When melted, leave to one side to cool.

Add the eggs and sugar to another bowl and mix until creamy. Now fold in the cooled chocolate mixture, then the flour and finally the baking powder and cocoa.

Chop the remaining chocolate into small chunks and stir in 3/4 of the chocolate into the mixture. Pour the mixture into your prepared tin and level the surface. Sprinkle the left over chocolate chunks evenly on top, pushing slightly into the mixture.

Put in the oven and bake for 35-40 minutes, until the top is starting to crust. Remove and leave to cool before slicing it into 12 big pieces or 16 smaller pieces.


Happy Baking! 
x

Please leave a comment below! 
Follow @nicsfeasts and @NicckkNackk


Saturday, 14 July 2012

Pretty Pink Rose Wedding Cake

It's become a tradition at my school, that when you reach Year 10, the whole year puts on a mock wedding.  Now, whenever I mention this to someone, I always get the same reaction. The puzzled look. Why would a school hold a mock wedding? It's strange I know. And I'm not totally sure why we do it. We are a Church of England school and part of our R.E (religious education) GCSE is to do with Christian Weddings and Divorce. It's also ran by the students who took long course R.E (meaning the get a full GCSE in it, as opposed to half). So they organise it and have first pick of the roles. Yes, there's the bride, the groom, ushers, bridesmaid, the whole shoobang really. One of my good friends, Clare, was picked to be the bride and she looked amazing!    
  

Most of my friends ad become involved. One was the photographer, another the hair stylist, one in the band and then two in the bridal party. So I offered to make the wedding cake along with two other friends. Originally I hadn't realised what a big task it was. And our R.E teacher assured me it had been done well in the past so we had to impress. The first mammoth task was to find a recipe and the correct cake tins. It was harder than you think. But with help from teachers and my mums friends we got a 12 inch, a 10 inch, an 8 inch and a 6 inch. The next part was the fun part; Designing the cake! And we weren't short of ideas.


We decided to match the colour scheme of pink and go for sponge as fruit cake was expensive and we were on a budget! We used butter icing for the two chocolate layers and royal icing for the 2 vanilla layers.

For the 12 inch Chocolate layer:

340g (12oz) Margarine, at room temperature
340g (12oz) Caster Sugar
6 eggs
170g (6oz) Self Raising Flour, sifted
70g Cocoa Powder, sifted
3 tsp Baking Powder, sifted
1 tsp Vanilla Extract

Preheat the oven to 180oC/356oF/ Gas Mark 4. Grease and line the cake tin with greaseproof paper or baking parchment. 


Cream the margarine and caster sugar together in a bowl until light and fluffy.

 Add 2 eggs wit ha heaped tablespoon of the flour. Beat well. For best results use an electric hand whisk. Repeat for all 6 eggs. 
Fold in the remaining flour, the baking powder, the cocoa powder and the vanilla extract using a large metal spoon. When all the ingredients are combined, pour into the prepared cake tin and bake for 45-50 minutes.

To make sure it's cooked thoroughly, place a skewer through the middle of the cake and it should come out clean. 
                                     
Leave the cake in it's tin to cool for 5 minutes and then transfer to a wire rack


Repeat these steps for the other 3 tiers, using the following ingredients and cooking times. 

For the 10 inch Vanilla Layer:
280g (10oz) Margarine
280g (10oz) Caster Sugar
5 Eggs
280g (10oz) Self Raising Flour, sifted
2 ½ Baking Powder, sifted
2 tsp Vanilla Extract

35-45 Minutes

For the 8 inch Chocolate Layer: 
225g (8oz) Margarine
225g (8oz) Caster Sugar
4 Eggs
180g (6oz) Self Raising Flour, sifted
45g Cocoa Powder, sifted
2 tsp Baking Powder, sifted
1 tsp Vanilla Extract

25-35 Minutes

For the 6 inch Vanilla Layer
140g (5oz) Margarine
140g (5oz) Caster Sugar
2 Eggs
140g (5oz) Self Raising Flour
1½ tsp Baking Powder
1 tsp Vanilla Extract

20-25 Minutes

For the chocolate layers, they are going to be decorated with butter icing. We made our batches of icing our of 500g of Sieved Icing Sugar and 250g of Margarine. Colour it with pink food colouring. Cover the inch in a thin layer of butter cream to seal any crumbs. Then use the technique I used in Beth's Rose Birthday Cake to create the rose look. For the 8 inch cake, I used 2 8 inch sandwich tine, but if your using 1 big 8 inch tin then cut the cake in half. Sandwich the two halves together with butter cream and repeat the steps for the 12 inch. By this time, you will have had to make more icing. 


When decorating, the vanilla layers are covered in white royal icing. Firstly, cover them in a very thin layer of butter cream. This is so that the royal icing sticks. Roll out some icing to a depth of 4mm. To find out a big to roll out, take a clean ruler and measure the length of the side, top and other side.

Place onto a rolling pin and lift up and onto the cake. Use a cake smoother to create a clean finish. Use a sharp knife to cut vertically down to remove excess icing at the base. Repeat with the cake smoother. 
Use this method for both vanilla cakes.

When stacking the cake layers, you must do this at your venue. To support our cake, we inserted straws into the bottom 3 layers and then placed the layers on top. This did work, but we could see that it started to sink after a few hours. So I would recommend watching this video as to how to stack your cake. 

For extra decoration, I bought this butterfly cutter in a sale at Lakeland and I love it! The butterflies are so cute and were the perfect finishing touch. 
Simply, roll out some icing and cut the butterflies. For an extra finish, I layed them on creased cardboard to bend their wings so they looked more realistic. 


Happy Baking! 
x

Please leave a comment below! 
Follow @NicckkNackk


 P.S A picture of me and my friend millie :)